praesto писал(а): Сб ноя 30, 2013 20:26
Хм, давненько не обрабатывал в Силке и после Ваших "вкусных" пояснений хочется вновь попробовать

Цвет там получается по тому же принципу, что и в С1: сначала выбирается "вкус" (их больше десятка стандартных) и его профиль (один из четырех), а тонкая доводка понятна интуитивно:
4.10. Fine Color Control
The fine color controller is a powerful color adjusting function that can freely handle colors.
Select [Display (V)] [Fine color controller] from the menu to display the "Fine color controller" sub-control.
It can also be displayed from the fine color controller icon in the sub-control icons at the bottom of parameter controls.

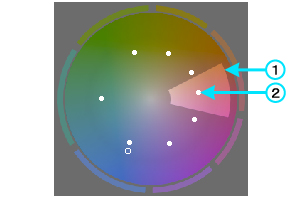
The fine color controller divides colors into 8 hues and provides a function for adjusting colors in each of the hues.
The color circle hue display shown on the control is arranged so that white is in center of the chroma chart, with color positions starting at the 3:00 position on a clock and going clockwise in the following order.
Color name
Rose red
Purple
Ultra marine blue
Turquoise
Blue-green
Green
Yellow-green
Golden yellow
Color placement is arranged on this color circle such that the further from the center of the color circle, the higher the chroma, and they are placed at average color intervals as much as possible to meet human perception.
* A chroma chart of average color differences, called the CIE 1976 UCS Chroma Diagram, is used on the color circle.
There are two main ways to adjust parameters on the fine color controller. These are a method of operating a mouse on the color circle and a method of setting parameter values using a slider control.
Please use these together for effective parameter adjustments.
The Fine color controller has improved with SILKYPIX® Developer Studio Pro 5, and operations differ from earlier versions. Please see "4.17.2. Compatible mode" for details.
4.10.1. Adjustments using the color circle
As seen in the diagram of the color circle shown above, the color circle is divided into 8 hue blocks, and there are operation points in each of these blocks.
(1) shows a block, and (2) shows an operation point.
A hue for operation is selected by clicking any of the 8 blocks. Borderlines of the blocks of hues for operation are displayed in bold.
Operation points in each block can be moved by dragging the mouse or with the mouse wheel.
With either of these methods, movements along the circumference are interlocked with "Hue," and distance from the center of the color circle is interlocked with "Chroma."
Adjusting the "Brightness" parameter can be done with the mouse wheel, but it will not be shown on the color circle.
Parameters adjusted through mouse operations are reflected on the slider control, so both the color circle display and the slider control display are synchronized.
[Mouse wheel operation]
You can operate the "saturation" slider with the mouse wheel on color circle GUI.
[SHIFT] key + mouse wheel is for the "hue" slider and [CTRL] key + mouse wheel is for the "lightness" slider.
4.10.2. [Adjusting with the sliders]
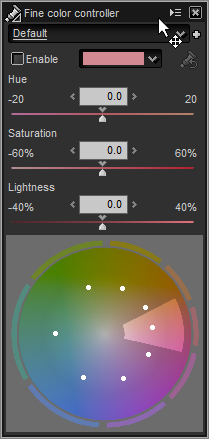
Adjustments to each parameter value on standard controls, compared to the method of adjusting the color circle with the mouse, will be explained here.
(1) Enable checkbox Enable the fine color control.
(2) Hue adjustment Select a hue for adjustment from the dropdown list.
(3) Hue Set how much change in hue. Set the angle in counter clockwise rotation from the reference point.
(4) Saturation Set the ratio assuming that the distance from the center of the color circle to the reference point is 100%.
When setting -20%, the operation point moves to the inside by 20%, and the saturation level is decreased. When setting 20%, the point moves to the outside by 20% and the saturation level is increased.
(5) Lightness Set the ratio assuming that the lightness of the reference point is 100%. When setting -20%, the lightness level is decreased, and setting 20%, it is increased.
(6)

(Initialize) Return all points to the initial state.
4.10.3. Methods and Notes on Utilizing Fine Color Controller
The Fine Color Controller is a color transformation tool that displays emphasized colors or, conversely, moderates them, and changes colors.
It is advantageous to perform adjustments on the image as the last process because color engineering is a type of image processing that destroys the balance of colors.
We hope that you will experiment and use the various functions, but one matter that requires attention is that it is advantageous to adjust white balance, exposure, color profiles and color expressions before adjusting the fine color controller.
White balance and exposure are basic adjustments and giving priority to these adjustments does not mean that you are limiting fine color controller, but if you perform fine color controller adjustments first, you may not be able to adjust the white balance and exposure as you would like.
The color profile and color expressions are items you should try adjusting before using the fine controller if you want to emphasize the subject.
It would not be an exaggeration to say that the color profile and color expression are types of fine color controller tastes. First select a color profile and color expression that seems to be desirable before independently adjusting the fine color control.
[Example of adjustment] One example would be a photograph of a person as the main subject taken close up against a background of a blue sky and red flowers.
(1) If the sky turns purple under the influence of white balance adjustments so that the person's skin color is a favorable pink, adjust so that the sky turns into a favorable sky-blue. => This technique is for adjusting only colors that seem strange such as when a sense of incongruity is born out of the entire photograph due to over emphasizing the main subject by not using the right amount of white balance.
(2) After appropriately adjusting the white balance, adjust the orange and red so that the person's skin color will be flattering, and then further adjust so that the blue sky will also be a good color. => This is a technique for true adjustments of basic correct white balance and adjusting so that the colors you want to emphasize are favored.
(3) Adjust so that the red flowers become pink. => There may be cases when you do not want to emphasize colors or adjust to a memory color, but rather make adjustments with the effect of changing colors to something different than reality.
(4) If red flowers are two bright and there is a whiteout effect, control the whiteout by lowering the red chroma. => Adjustments with the highlight controller to exposure and saturation will influence not just specific colors, but the entire photograph. This is an effective method for adjusting only specific colors.
Please see "10.1.5 Mitigating Whiteout" for details.
* If the mouse cursor is over the preview image, the color the mouse cursor is pointing to will be displayed in a circle over the color circle. Placing the mouse cursor where you want to adjust on the preview image will be an indicator of what color block would be good to adjust. * This parameter category can be turned on / off. Please see "4.17.1 Turning On / Off" for details.


 .









 [/oft]